I’ve looked at multiple YouTube Videos and Tutorials on water marbling. At first I was thinking “that’s entirely too much work”… but a little part of me was still itching to try it. Last night was that night – I got home from work, got cozy in my chair and got started.
To start – you need room temperature water (distilled or filtered works best). I grabbed a bottle of Dasani water that was sitting out on the table. I poured some into a small ceramic cup and added in a little bit of Zoya’s Remove + to the water (I read somewhere to add a little nail polish remover OR cuticle oil to the water). I grabbed a couple wood skewers to use in lieu of a toothpick to make my design – it was easier for me to pick up and grip while attempting this.
Biggest thing with marbling – MOVE QUICK. I would do the polish drops in water and take too long, and when I attempted a design, the first 2 drops had already hardened a little and my design pulled into a glob on top of the water and I would need to start again! Once I got the speed and rhythm down – I was good to go.
I painted my nails with Marley and then taped off my fingers. Nick (my boyfriend) helped me with this so I wouldn’t screw up any of my nails that had Marley on em. I really don’t think this experience would have gone over well if I didn’t have help with it.
I grabbed about 10 Zoya colors I was interested in using, at first I settled on Zara, Caitlin, Layla and Snowsicle…. but Layla and Caitlin were overpowering Zara and Snowsicle. Nick suggested I cut it down to 3 colors and take the grey colors out completely.
I looked around again and decided to use Snowsicle, Isla and Layla with Marley as my base color. I didn’t focus on trying to get the same design in each attempt, I was trying to see what I liked so every nail would be very different design wise. Here are some “action shots” Nick took.
All 3 colors I used spread easily and very well! Snowsicle is a GREAT color to use, the hint of shimmer was just gorgeous.
Once I got a design I could deal with, I carefully submerged my nail into the design and held it in the water while quickly using the skewer to get all the excess polish away from my nail. If you don’t do this part, you chance getting a glob of excess polish on your nail as you pull the nail out of the water.
Even with tape on my fingers, I still managed to get some paint below the tape. Overall though, I was pleased with the design.
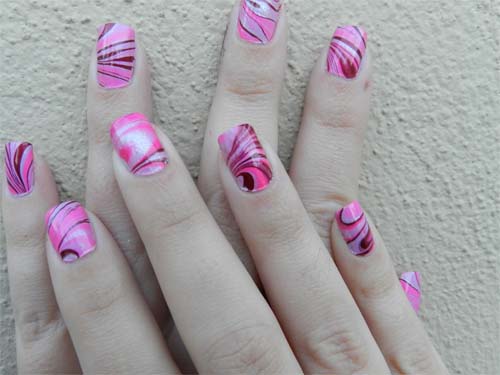
End result:
Here is the final result! Overall I am very happy with this and it wasn’t as horrible as I thought it would be… but it is time consuming! It took me about two and a half hours!
List of everything I used:
Small Ceramic Cup, Dasani water (Room Temp), Paper towels (to wipe off skewer between designs), Nail polish remover (to add to water), 3 wood skewers, Zoya Nail Polish in Marley, Isla, Layla and Snowsicle, and Scotch Tape


3 comments
I still think this is great!
Thanks! I’m still shocked it came out as good as it did! In the next day or 2 I’m attempting the newspaper nail thing!
[…] old (after I did a water marble using their products) wanna see my baby blog post from back then? Check it out HERE. The layout is 10 kinds of messed up from posts way back then, but that’s […]
Comments are closed.